HOW TO GET STARTED: SPLITBOARDING

If you’re wanting to head off piste into the backcountry, away from long queues and lots of people, looking for a new adventure then you’ve come to the right place. As splitboarding rises in popularity we’re here to give you all the information you need to get started.
Our stores have a wide range of splitboarding equipment, so if in doubt, visit us in store and get advice from our in-store experts.
What is a splitboard?
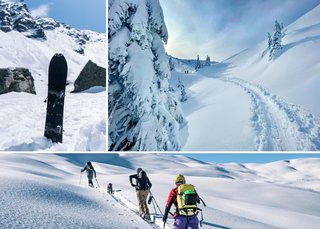
A splitboard is a snowboard that has been cut in two, vertically, to make two ‘skis’ and is key for any snowboarder who wants to access the true backcountry. Once apart, these skis can be used to hike uphill using climbing skins to reach the perfect powder out in the backcountry, similar to a snowshoe. Once you’ve reached the top, you fit the skis back together to create a snowboard to ride down.
While splitboards ride similarly to normal snowboards they won’t feel exactly the same. Splitboards are usually stiffer to compensate for the reduction in rigidity and you may notice extra chatter or flex on piste.
Splitboards requires specific bindings, clips, and equipment to ensure a safe ride down the mountain. We’ll take you through the follow splitboarding essentials:
Splitboards
As splitboarding is rising in popularity, more and more brands are releasing their own options with a variety of camber profiles and shapes. Choosing the right splitboard is similar to choosing a regular snowboard and should be based on your weight, ability, riding style, and the terrain you’ll be riding on.
While some snowboarders prefer to create their own splitboard using different power tools, factory made splitboards are the easiest, but more expensive option. With sealed inside edges, factory inserts, and pre-installed clips, they’re ready to take on the mountain without the fuss of hacking up your board.
Many brands now offer women specific splitboards with narrow waist widths, softer flex, and a larger range of smaller sizes.
POWDER
Riders tend to size up when it comes to powder boards; allowing for more float in deep powder. Consider a board with a tapered tail and some form of rocker allowing your tail to sink and your tip to rise.
FREESTYLE
If you’re looking for something a little more playful, ideal for riding switch and hitting side hits, go for a twin tipped board.
FREERIDE
Go for a directional and stiff board with camber under your back foot to give you performance and control and rocker in the nose to stay afloat in deep powder.
Interface
The splitboard interface connects the binding in two different ways to enable you to climb up the mountain and snowboard down it. When climbing, the bindings are hinged just like on touring skis. Whereas, when riding down, the bindings lock into a snowboarding stance.
There are two main categories of interface; puck-style and all others. Puck-style interfaces feature plastic or metal pucks that mount on the splitboard. When riding downhill, you simply slide the bindings onto the pucks and secure them in place with a clamp, pin or fastener. For travelling uphill, you remove the bindings from the pucks and attach them to the hinges on the splitboard skis securing them in place with the clamp, pin or fastener.
Other style interfaces feature various methods for attaching the bindings to the board, but most feature a clamp or twist to hold the board together for downhill riding. You then unclamp or untwist the bindings and move them up the hinges on the splitboard skis for traversing uphill.
There are many interface systems to choose from, and when deciding which is best for you, it’s important to consider whether your bindings are compatible and how easy it is to attach and switch over your bindings.
Bindings
Almost any snowboard bindings can be used as splitboard bindings with the right puck system or adapter kit. However, splitboard-specific bindings tend to be lighter in weight, offer direct puck system integration, quick-release mounting systems, and climbing bars and are becoming increasingly popular.
When choosing splitboard specific bindings, there are two main types to choose from; soft-boot bindings and hard-boot bindings. Soft-boot bindings are the most popular as they look and perform a lot like regular bindings with the surfy feel that many snowboarders love. As well as featuring similar ratcheting straps and highbacks, they work with conventional, soft snowboard boots.
Hard-boot bindings are a more niche choice favoured by experienced backcountry riders. They do away with highbacks and straps in favour of step into tech-style toe pieces, which offer greater freedom of movement when travelling uphill.
The most important thing when choosing splitboard bindings is making sure they’re compatible with your interface, as some interfaces require specific bindings. For example, the Karakoram interface must be used with Karakoram bindings.
Split hooks and tip and tail clips
Split hooks help keep the two halves of your splitboard together giving more torsional stiffness. Tip and tail hook clips are small plastic pieces that connect at the tip and tail. These give your splitboard a more solid and supportive ride.
Climbing skins
Aside from your splitboard itself, climbing skins are one of the most critical parts of your kit. They’ll provide the necessary grip for you to ascend, which is what you’ll spend most of your time doing when heading into the backcountry.
Adhesive-backed pieces of fabric, climbing skins attach to your tips and tails to help you walk up the hill. They feature using tiny hairs that point towards the tail of your board which stick in the snow and prevent you from sliding backwards. Climbing skins are held onto your splitboard skins using glue and mechanical hardware, known as the attachment. Your skins must fit your skis or splitboard properly, or you’ll have a hard time once you hit the powder.
Skins are usually made of nylon, mohair or a mix of the two materials. Nylon skins tend to be incredibly durable, offer excellent grip and deliver good value for money. Mohair skins provide better glide and tend to be lighter and more supple but are generally less durable and slightly more expensive. Mohair and nylon mix skins blend the benefit of both to offer good all-round performance.
Look out for a more environmentally non-toxic glue that delivers the same level of stick and waterproofing without causing as much damage to the planet.
Splitboard Crampons
In icy conditions you may find yourself needing some extra help to get up the mountain and this is where crampons come in.
Splitboard crampons work in the same way as boot crampons but attach to your splitboard ski bindings. There are two types to choose from fixed crampons or pivoting ski crampons. Fixed crampons offer universal compatibly with a mounted disk, are easy to put on or take off and offer good purchase into the snow.
Pivot ski crampons offer better glide than fixed crampons but don’t provide as deep purchase when heel raisers are up.
Poles
Snowboarders don’t usually use poles, but when splitboarding, they’ll become essential when tackling climbs and are a great addition should you fall in deep snow and need a boost to get back up.
The good news is that there’s no need to buy specific splitboard poles, as any collapsible pole will do the job. Collapsibility is a must-have as you want your poles encumbering you when your riding downhill.
Avalanche safety
Whenever you head out into the backcountry you should always carry an avalanche transceiver, a shovel, and a probe to help you find, and be found, in the event of an avalanche. Even with proper rescue technique, the chance of survival in an avalanche is very low so it’s important you can act quickly.
AVALANCHE AIRBAG
There are two types of avalanche safety packs designed to increase your chances of survival in an avalanche burial.
The first is an airbag which can be activated and inflated within seconds to help keep you afloat of an avalanche by keeping you in a more horizontal position, preventing you from sinking, and allowing you to be carried along the surface of the snow mass.
The second system is an AvaLung pack which allows you to maximise your available oxygen in the snow mass, while expelling CO2 away from your face.
Many experienced riders carry both.
Don't forget
Riding outside the designated ski areas means taking a risk and accepting the dangers you might face, whether it’s avalanches, cliffs, tree wells, or simply getting lost. If you aren’t comfortable making the decision of which route to take and where to go, don’t take the risk.
Carrying the right gear and knowing how to use it, minimises some danger posed by avalanches, so make sure you’re educated on what to do if the snow slides. You can find out more in our guide to avalanche awareness and mountain safety guide.
Most European and North American resorts have companies that offer avalanche safety training where you learn about the dangers of backcountry, how to lessen them, as well as further understanding of snowpack and stability and avalanche rescue. You can also find these classes in most UK snow domes.

Let us know you agree to cookies
We use marketing, analytical and functional cookies as well as similar technologies to give you the best experience. Third parties, including social media platforms, often place tracking cookies on our site to show you personalised adverts outside of our website.
We store your cookie preferences for two years and you can edit your preferences via ‘manage cookies’ or through the cookie policy at the bottom of every page. For more information, please see our cookie policy.