
Snowboard Bindings Buying Guide
Bindings are the link between your boots and your board, so everything you do on a snowboard goes through them. They're also easy to get wrong: a pair that's the wrong size, the wrong stiffness, or the wrong fit for your board's holes won't do its job, however good it looks. Four checks settle it: the type, the flex, the size, and whether they fit your board.
What Types of Bindings Are There?
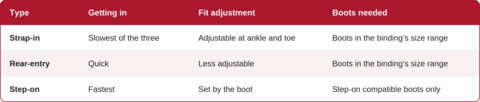
Strap-in bindings are the standard. Two straps, one over the ankle and one over the toe, tighten with ratchets, and you can adjust each one to your boot. They take a little longer to get into than the other types, which you'll notice on a cold chairlift.
Rear-entry bindings have a single strap over the toe and a high back that folds down, so you slide your boot in from behind and close it. Getting in is quick, but you get less say over the fit than with two straps.
Step-on bindings drop the straps altogether. Compatible boots click straight into the binding, which makes them the fastest way in and out, and a good fit if you spend the day getting in and out, like instructors and parents riding with children. The catch is that they only work with compatible boots, so the two have to be chosen as a pair. Burton developed the system, and a few other brands now make compatible gear, so check that your boots and bindings are made for each other.
If you ride a splitboard, you'll need splitboard bindings, which switch between climbing and riding modes.
Once you know which type you want, you can compare them all in the snowboard bindings range.
What Should You Look at on a Binding?
This is the plate behind your calf, and it controls your heelside edge. A taller, stiffer highback gives more response at speed, while a shorter, softer one leaves your ankles freer for tweaks and grabs.
It connects the binding to the board. A stiffer baseplate passes power through more directly, and a softer one is more forgiving and cushions landings.
The ankle strap holds your heel down and passes on your movement, and an evenly spread strap is kinder on your foot. The toe is held by a strap or a toe cap, which pulls the boot back into the heel cup. Some rear-entry and youth bindings use a one-piece strap to keep things simple.
EVA foam or gel under the foot soaks up vibration and landings. Freestyle riders tend to want more of it, and riders who want a sharper feel for the board go for less.
They tighten and loosen the straps, so check they're easy to work with gloves on.

What Flex Do You Need?
Binding flex is rated on a scale of 1 to 10, though brands don't all measure it the same way, so treat the number as a guide and compare within a brand where you can.
- Soft (1 to 3): forgiving, and a good fit for beginners and freestyle riding
- Medium (4 to 6): balanced support for all-mountain riding
- Stiff (7 to 10): sharper response at speed, for advanced and freeride riders
Aim to match the binding's flex to your board, and keep your boots in mind too. A soft boot in a stiff binding, or the other way round, works against itself, so a similar flex across the whole set-up feels better.
Which Bindings Suit How You Ride?

What Size Do You Need?
Bindings are sized to your boots, usually from S to XL, and the ranges differ between brands. One brand's medium can cover different boot sizes from another's, so check the size chart on the binding's product page instead of going by your usual size. If you're between sizes, going up is the usual advice, because a tight binding pinches your toes.
To check the fit, do up the straps. The ratchet should sit around the middle of its track, your boot should flex without sliding about, and your heel should sit snugly in the cup with no lift at the heel or toe.
A little boot overhang past the board's edge is normal. If your boots stick out a long way, the board is probably too narrow for your feet and you'll catch your toes or heels in turns. Women's and kids' bindings are built around smaller boot sizes and come in their own size ranges, so look at the range on the size chart rather than the label.
Will They Fit Your Board?
Bindings bolt on through the holes in your board, and those holes come in a few patterns.
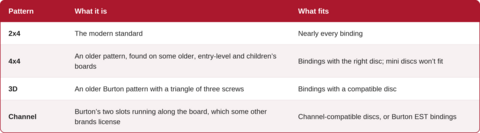
Burton's EST bindings only mount to Channel boards, while its Re:Flex bindings use a disc that works with 2x4, 4x4, 3D and Channel. Check the mounting pattern or compatible discs listed for the binding before you buy. Burton makes both kinds, so if you're leaning that way, the Burton bindings range is a good place to start.

How Do You Set Them Up?
You can mount bindings yourself or have a shop do it. If you're doing it yourself:
- Use a hand screwdriver, not a drill, since it's easy to over-tighten and strip the inserts
- Start at the reference stance marked on the board, then adjust to suit
- A duck stance is the usual starting point: front foot angled out and back foot angled out the other way, for example +15 and -9, or +15 and -15 if you ride switch
- Line the highback up with the board's heel edge
- Start with a little forward lean, since more lean gives a sharper heelside response
- Tighten the screws again after your first full day, then check them now and then through the season

Common Mistakes
- Sizing by shoe size instead of the binding's own chart
- Putting a stiff binding on a soft board or boots
- Assuming a binding fits every board without checking the mounting pattern
- Buying step-on bindings without compatible boots
- Over-tightening with a drill, or never rechecking the screws
Start with the type, then match the flex to your board and boots, size them by your boot and check the mounting pattern. Once they're on, a quick recheck of the screws after the first day keeps them solid.
Browse snowboard bindings at Snow+Rock, or look at the Burton Step On range if you'd rather skip the straps.

FAQs
Snowboard bindings are sized by boot size, usually from S to XL, and the ranges vary between brands. Check the size chart on the binding's product page, and if you're between sizes, going up is the usual advice.
No. Compatibility depends on the board's mounting pattern: 2x4, 4x4, 3D or Channel. Burton's EST bindings only fit Channel boards, and some bindings need a specific disc, so check before you buy.
Snug, but not painful. Your foot shouldn't move inside the binding, but you should still be able to flex your ankle. Over-tightening can restrict blood flow and cause pain.
Boots within a binding's size range generally fit strap-in and rear-entry bindings. Step-on bindings only work with step-on compatible boots, so check the pairing first.
Match the binding's flex to your board and boots: soft for beginners and freestyle, medium for all-mountain and stiff for fast, aggressive freeride. Brands rate flex differently, so use the number as a guide.
Strap-in bindings have two straps and the widest range of adjustment. Rear-entry bindings have a folding highback and one toe strap for quicker entry. Step-on bindings have no straps and click into compatible boots.
Adjust the straps, highback angle and forward lean to suit your boots and how you ride. Keep the straps centred over the boot, and line the highback up with the board's heel edge.
Related Articles


Let us know you agree to cookies
We use marketing, analytical and functional cookies as well as similar technologies to give you the best experience. Third parties, including social media platforms, often place tracking cookies on our site to show you personalised adverts outside of our website.
We store your cookie preferences for two years and you can edit your preferences via ‘manage cookies’ or through the cookie policy at the bottom of every page. For more information, please see our cookie policy.